2.10.2014

Card Sketch


Do you struggle with creating using a card sketch? Sometimes they are harder for me than starting with a blank canvas. Thankfully that was not the case this month! I was instantly inspired when I saw this month's sketch.


My order arrived last week with many fun new products that I couldn't wait to get my hands on. However, since I started working full time last week, I had to wait until the weekend to get inky!


I knew that the birthday greeting from Another Great Year would be perfect in the open space. Initially, I was going to use three of the small Starburst cut-outs in the upper right corner for the banner, but it just didn't look right. So I edited it a little bit.

I had so much fun with Pink Pirouette last week for our color challenge, that I wanted to use it again this week. I grabbed the Color Coach for inspiration for my other colors. It recommended Pool Party and Crumb Cake. Perfect! I used Crumb Cake to stamp the greeting on Pink Pirouette. The rest of the layers feature Tone-on-Tone stamping. (i.e.-Pool Party on Pool Party and Crumb Cake on Crumb Cake) The Celebrate banners across the top are "fussy" cut from one of the stamps from Starburst Sayings.

If today's sketch INKspires you to create, please link up with the post this week at Stylin' Stampin' INKspiration.

Another Great Year

Perfect Pennants

Starburst Sayings Framelits Bundle

Gold Baker's Twine

Other supplies used:
  Cardstock: Crumb Cake, Pink Pirouette, Pool Party
  Ink: Crumb Cake, Pool Party
  Tools: Paper Trimmer, Simply Scored, Bone Folder, Paper Snips, Big Shot, Magnetic Platform
  Adhesive: SNAIL, Tombow Multipurpose Liquid Glue

2.07.2014

Shape It Up


While I would say that 90% of my cards are the "standard" A2 card size (4.25" X 5.5"); I sometimes enjoy mixing it up and creating a shaped card. This is super simple to do with my Big Shot and any of the Framelits that Stampin' Up! has to offer. Today I chose the Banner Framelits currently available in the Occasions catalog through May 31st.


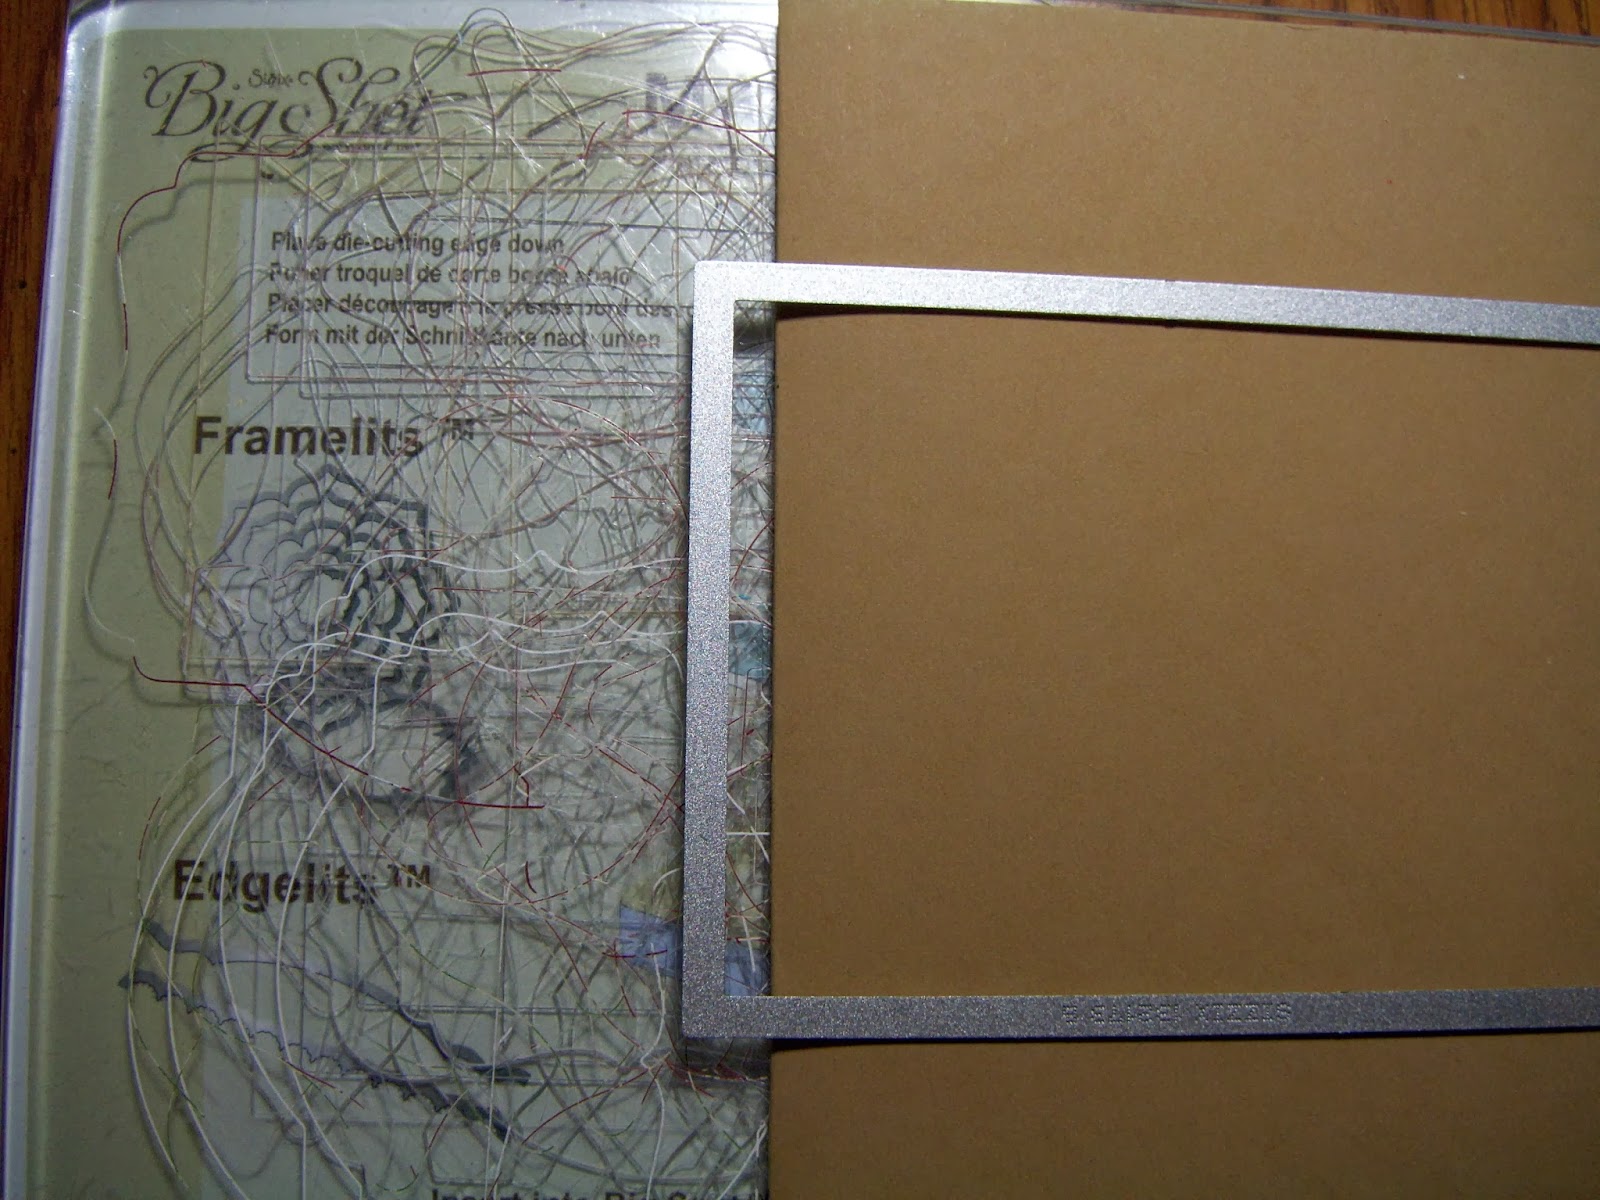
To create a shaped base, you score and fold your cardstock just as you would for any other card. Build your "sandwich" on your cutting platform. For the shaped cards, I highly recommend using the Magnetic Platform so it doesn't shift and you end up with a lopsided card. When placing your framelit on the cardstock, you want the end by your crease to actually be off the top of the crease. This way when it cuts, you still have a creased card.
Perhaps a picture will make it more clear. (Yes my cutting plates are well-loved!)


I used the largest banner in the set for the base. I used the next to smallest one to cut three different patterns from the Fresh Prints Designer Series Paper Stack. The greeting is from the Perfect Pennants stamp set, which coordinates with the Banner Framelits. In fact, you can buy them together in a bundle and save 15%! I used the stamp-off technique on the greeting, which gave it more of a worn look to match the DSP. To stamp-off, ink up your stamp, stamp it on a piece of scratch paper and then stamp on your cardstock without reinking.

I made this card for our Design Team challenge today. That means you can jump over to Stylin' Stampin' INKspiration and find more shaped cards from the other designers!

Supplies used:
  Cardstock: Soft Sky, Whisper White
  DSP: Fresh Prints Stack
  Stamp set: Perfect Pennants
  Ink: Real Red
  Embellishments: White Baker's Twine
  Framelits: Banners
  Tools: Big Shot, Simply Scored, Paper Trimmer, Paper Snips
  Adhesive: SNAIL


2.04.2014

Technique Tuesday


We've got a fun technique for you today at Stylin' Stampin' INKspiration. It's called 3 In A Row. The idea behind this technique is that you ink your stamp once and then stamp three times.


I've used this technique before to give the illusion of falling leaves or a bouncing ball. If you want to line your images up in a perfect line, I recommend using the Stamp-A-Majig. There's a great tutorial featuring it today at SSINK. I'd also be happy to give you live demonstration of it, if you'd like. It really is a fabulous tool; once you figure out how to use it!

Today's card features many new items from the Occasions Catalog. The star and the greeting are both from the Perfect Pennants stamp set. The greeting was cut out using the Starburst Framelits. Of course, there's that yummy Retro Fresh This & That Designer Washi Tape. A new favorite is the Gold Sequin Trim. The sequins actually come on a string, but you can carefully pull them off and use them individually. They are the perfect size to use a Glue Dot to adhere them. I used the smallest Deco Labels framelits (found in the Annual Catalog) to layer the Tangerine Tango behind the greeting.

Deco Labels

Starburts

Gold Sequin Trim

Retro Fresh This & That Designer Washi Tape

Perfect Pennants

Other supplies used:
  Cardstock: Soft Suede, Whisper White, Tangerine Tango
  Ink: Tangerine Tango, Coastal Cabana
  Tools: Paper Trimmer, Simply Scored, Bone Folder, Big Shot, Magnetic Platform
  Adhesive: SNAIL, Stampin' Dimensionals, Glue Dots

2.03.2014

February Color Challenge

It's color challenge day over at Stylin' Stampin' INKspiration! We hope that our colors and designs will inkspire you. Check out everyone's projects, go create a project of your own, and then link your blog up with ours over at SSINK!

Here are the colors that we're working with today:


Here's my creation:


The base is Pink Pirouette. I measured the stamps that I wanted to use from Countless Sayings 2 so that my cardstock was just slightly larger. The top part of the greeting is 2-1/4" x 1-3/4". The Pink Pirouette and Wild Wasabi pieces are the same size. I laid the "you," "make," and "me" on the cardstock where I wanted them, and then pushed the block down on top of them. This way they were already lined up and saved some me inking, stamping, and cleaning time. The Pink Pirouette and Wild Wasabi for the "Happy" measure 3-3/4" x 1-1/4".

I used the Secret Garden Framelits to cut out the leaves and stamped flower. I trimmed the excess off the stem of the leaves so that it wasn't sticking out from both sides of the flower. The flower image was stamped in Chocolate Chip on Very Vanilla cardstock. I then colored the petals with a Blender Pen and Pink Pirouette Ink; and the center with the Blender Pen and Wild Wasabi ink. Here is a closer picture for a little more detail.


Supplies used:
  Cardstock: Pink Pirouette, Wild Wasabi, Chocolate Chip, Very Vanilla
  Stamp sets: Countless Sayings 2, Secret Garden
  Ink: Chocolate Chip, Wild Wasabi, Pink Pirouette
  Framelits: Secret Garden
  Embossing Folder: Woodgrain
  Tools: Blender Pen, Big Shot, Paper Trimmer, Simply Scored, Bone Folder
  Adhesive: Tombow Multipurpose Liquid Glue, SNAIL

1.31.2014

Friday Favorite


This is the last card that I made at the scrapbooking crop two weeks ago. It was definitely my favorite and one of those that just makes me smile everytime I see it.

Typically I start designing a card by picking which stamp set I want to use. However, this time I started with just the piece of Designer Series Paper from the Fresh Prints DSP Stack. (It's so cute!) From there I just started pulling cardstock and ribbon colors that inspired to me. Once I had that all assembled, then I had to stare at the card for awhile to decided what to stamp.


I narrowed it down to the Best of Birthdays set, which is only available to purchase until March 31st. My table-mate at the crop said the card was making her think of Mint Chocolate Chip ice cream, so she agreed that the cupcake would be a good choice. I decided to grab my Blender Pen and color in the image for some extra pizazz.

A little trick I did with the ribbon to save on how much I used: I used Sticky Strip to glue a piece just across the front. Then I pulled some away from the spool and tied a bow with the ribbon still attached to the spool. Once I had my bow how I liked it, I cut if off the spool. I fiddled with it a bit more to make it perfect and used a glue dot to attached it to the other ribbon. 

Thanks for stopping by. If you're like me, you are now headed to find some cupcakes and ice cream; or maybe just an Andes mint!

See other Friday Favorites at SSINK today!

Supplies used:
  Cardstock: Blushing Bride, Whipser White
  DSP: Fresh Prints Stack
  Stamp set: Best of Birthdays
  Ink: Early Espresso, Smoky Slate, Coastal Cabana, Blushing Bride
  Marker: Blender Pen
  Framelits: Squares Collection
  Embellishments: Early Espresso 1/4" Stitched Grosgrain
  Tools: Paper Trimmer, Simply Scored, Big Shot
  Adhesive: SNAIL, Sticky Strip, Glue Dots, Stampin' Dimensionals
 

1.29.2014

It's Kansas Day!

Happy birthday to Kansas! Today marks 153 years as part of the Union. If you're not from Kansas, you are probably thinking of Dorothy, Toto, tornadoes, and Oz. If you are from Kansas, you're thinking, "there's more to our great state than that!" While yes, we do have lots of tornadoes, in 35 years I've never personally seen one and only had one touch down within 10 miles of where I was once.

Growing up in Kansas, January was one of my favorite months because we always had a Kansas Day celebration at school. I remember spinning wheel demonstrations, "experiencing" life on the prairie, making candles, and coloring many pictures. I'm sure there was more, but it's been a few years.

I wanted to create a card today to celebrate something about Kansas. I chose our state flower, the sunflower. I found this picture on pinterest:


I was instantly inspired to pull out my brand new Banners Framelits to make this card:


The base of the card was inspired by our state flag:


The base of the card is Night of Navy. I used the Big Shot and Banners Framelits to cut 26 banners out of Summer Starfruit cardstock. I gave each "petal" some dimension by sponging Summer Starfruit ink around the edges with a Sponge Dauber. I used the 2-3/8" Scallop Circle to create the middle with Early Espresso cardstock. I ran it through the Big Shot with the Perfect Polka Dots embossing folder to give it a rougher texture similar to the sunflower seeds that grow in the middle. (That's right, sunflower seeds don't magically just come from a bag!)
I adhered it all together with Tombow Monoadhesive Liquid Glue. In hindsight, I now know that I should trim down the ends of the banner pieces hidden by the center piece. Layering them on top of each other made the center very bulky under the Early Espresso element.

Thank you for checking out my punch art card today. Please stop over at the Stylin' Stampin' INKspiration blog for some Kansas trivia!

1.28.2014

Mark It Up


I'll be the first to admit, my markers don't get enough love. Very rarely do I use them to color in a line image. I usually only grab them when I want to use part of an image. Or on the rare occasion that I've misplaced my ink pad. However, when the Countless Sayings 1 & 2 Photopolymer stamp sets were released my first thought was, "CUTE!" Followed closely by, "Markers!"
Countless Sayings 1
Countless Sayings 2


Once again, I successfully incorporated an item I haven't used in awhile; the Scallop Trim Border Punch. For the heart, I used the Heart Collection Framelits and then ran it through the Big Shot again in the Perfect Polka Dots Embossing Folder. I layered a piece of Whisper White cardstock on the inside that stamped that cute heart from the Countless Sayings 2 set in the corner.

Please stop on over at SSINK for some more inkspiration to get your markers out and use them!

Supplies used:
  Cardstock: Rich Razzleberry, Perfect Plum, Rose Red, Whisper White
  Stamp set: Countless Sayings 2
  Ink: Rich Razzleberry, Basic Grey, Rose Red
  Stampin' Write Marker: Tempting Turquoise
  Punches: Scallop Trim Border
  Framelits: Hearts Collection
  Embossing Folder: Perfect Polka Dots
  Tools: Paper Trimmer, Big Shot, Simply Scored
  Adhesive: SNAIL, Stampin' Dimensionals